
Micro-Nurseries
What Is A Micro-Nursery And How Does It Work?
A micro-nursery is a concept that I, Jim Wright, developed last year. The idea is that average gardeners set aside a small amount of space on their property and carefully tend 100 native plant seedlings they have planted in nursery pots, just like a professional nursery would do. The seedlings are tended until they are big and strong enough to be planted at a habitat restoration site. This takes one to two years.
Certainly we are not the first to grow native seedlings. Groups like the Washington Native Plant Society have been doing so for decades, with individual native plant enthusiasts doing this work and supplying their plants to other gardeners and habitat restoration sites. Their goal is to preserve native species. My concept is to recruit average gardeners who are not necessarily native plant enthusiasts, and leverage their gardening skills and resources to produce native plant seedlings that the organizations can commonly buy, and give them to the habitat restoration organizations. The goals are:
Create good quality native plant seedlings that will be used to restore important wildlife habitats
Save the habitat restoration organizations the cost of purchasing some of the seedlings they need
Educate citizen gardeners about the importance of habitat restoration, give them an opportunity to contribute, and connect habitat restoration organizations to members of the public.
How Do We Set Up A Micro-Nursery?
We begin each new planting of new baby seedlings in the early spring. A Micro-Nursery is little more than a collection of 100 plastic “1-gallon” commercial nursery pots, about 500 lbs of high quality potting soil, and 100 little seedlings, usually obtained from a commercial tree nursery. Each volunteer gardener plants their 100 seedlings in the pots with the soil provided, then arranges them together in a group that fits into whatever space they have available in their garden.
Each pot is 4 by 4-inches wide and 10 inches tall, so a 100 plant Micro-Nursery is just 40 inches by 40 inches, plus the frame (The tall pots are prone to tipping so need to be confined). The gardener provides a simple frame to keep the rather narrow pots from falling over. A piece of landscape fabric is placed on the ground under the pots so that the roots do not grow out of the drain holes into the soil underneath.
Photos of Setting Up A Micro-Nursery:

1.
Unloading 500 pounds of topsoil at a Micro-Nursery site
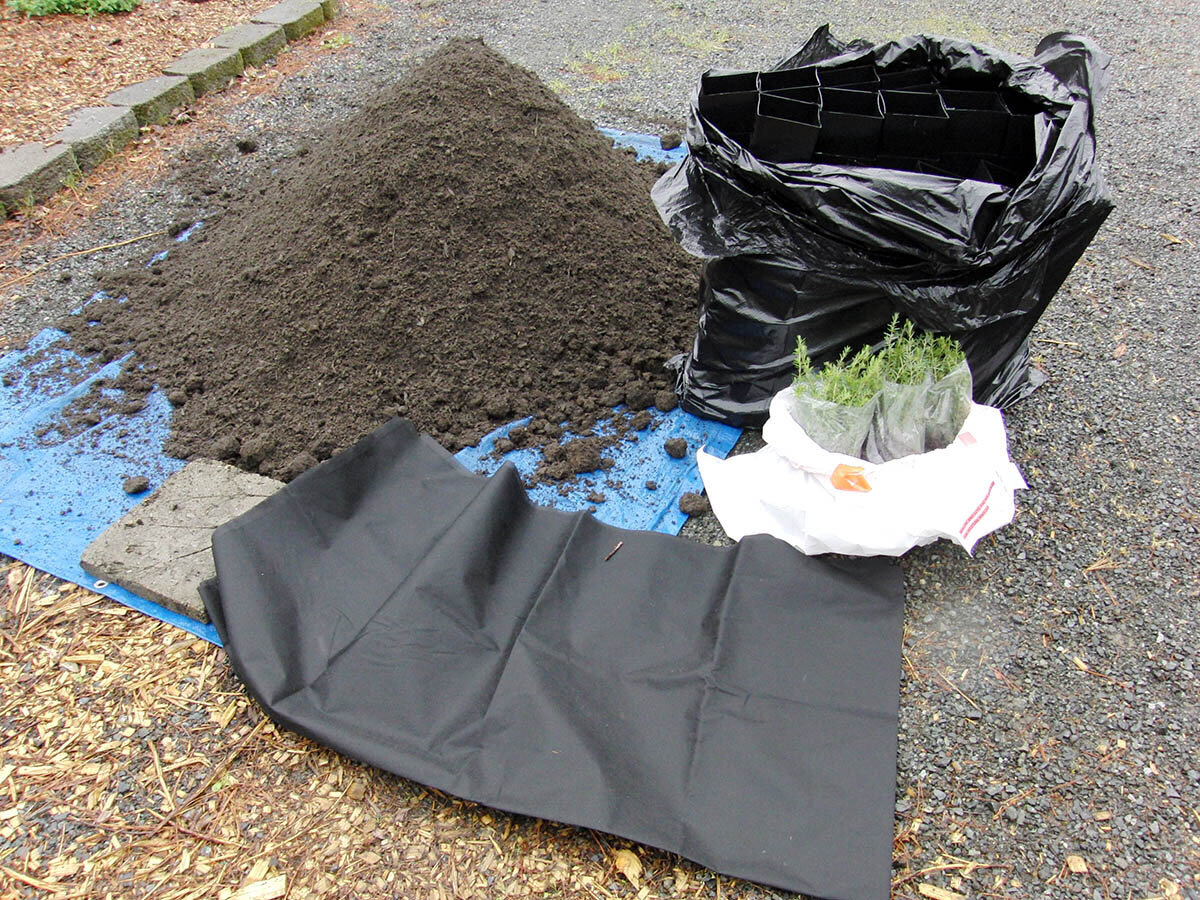
2.
All the materials to assemble a Micro-Nursery delivered to a volunteer’s house: 500 pounds of topsoil, 100 plastic nursery pots, 100 commercial nursery seedlings (these are western hemlock), and a piece of landscape fabric.

3.
Seedling is planted in in a 4 x 4 x 10 inch pot.

4.
A Completed Micro-Nursery. The volunteer must keep the plants watered and safe for the next 1 to 2 years before they are ready to be shipped to a restoration site to become a new forest!
How Do You Manage A Micro-Nursery?
Its pretty simple, but it requires the judgement and skill of someone with gardening experience. The new seedlings are fragile and must not be allowed to completely dry out, especially when first potted. Here in the Pacific Northwest, nature delivers frequent gentle rains that do the job for you most of the year, but prolonged dry spells can happen any time, and are certain in July and August. During a particularly hot spell, it could be necessary to water them daily, or at least every couple of days. Check your pots, and if the soil is still damp, water may not be needed. If you need to leave town for a while, get a friend or neighbor to take over watering for you, a great way to get more people involved. Some people rig up an automatic sprinkler for regular watering.
Its normal to lose a few seedlings at first, but as long as your trees are getting enough sunlight, but not too much, they will grow quickly. The right amount of sun depends on the species. Douglas Firs seem to to better in mostly full sunlight, while Sitka Spruce and western Red Cedar and Western Hemlocks prefer part shade. Nurseries erect fabric covers over their seedlings to provide partial shade. Home gardeners growing species that need shade should select a site that is partially shaded by other plants or buildings.
After one to two years, the seedlings begin to fill the pots with a dense network of roots, with roots growing out of the drain holes. This indicates the seedlings are getting ready to be shipped to a habitat restoration site. Plants are generally planted in restoration sites in the fall or early spring, though fall is best because they get more time to establish roots before the growing season resumes.
When we are ready to ship seedlings to a restoration site, we contact each Micro-Nursery volunteer and arrange to pick up their finished seedlings, or for them to transport them to the restoration site or a central collection point. The habitat restoration organization does most of the planting, but Micro-Nursery volunteers may have the opportunity to plant some of their finished seedlings in their new homes if the restoration organization can set up a public planting event.
Micro-Nursery Program Basics:
If there are other people or organizations who like this idea but are not located in the Puget Sound area, I thought it would be worthwhile to outline the steps I found necessary to set this up and get it going. Below is a list of steps and issues to consider that I learned while setting up Grow It Forward. Contact me if you would like more information.
First, determine whether you are able to reach out to your local gardening community and find gardeners willing to commit time and part of their property to grow seedlings for a period of one to two years.
Identify habitat restoration organizations in your area that are planting native seedlings. Study their web sites to see what kind of projects they do near your community.
Contact these habitat restoration organizations and ask what kind of plants they use. Ask whether they would be interested in getting some of their native plants donated by home gardeners.
Identify commercial nurseries that produce baby seedlings of the species that the habitat restoration organizations desire. Find out how much lead time they require for you to put in an order. Realize the nurseries need to plant seeds a year or two in advance, so you need to know how much stock they expect to have and the lead time they need from you before they sell out each year’s crop. You could grow some plants from seed, but realize this takes longer, and very careful tending of the seeds in order to get them to sprout.
Identify sources of topsoil, nursery pots, and landscape fabric. Find landscaping suppliers in your area who sell topsoil and have heavy equipment at their facility to quickly load pickup trucks.
Get verbal agreements from habitat restoration organizations to use specific numbers of your groups plants during their upcoming restoration projects in the next 1 to 2 years. Emphasize that the purpose is threefold: provide high quality plants at no cost, engage private citizens in habitat restoration, and raise awareness of these citizens in the work of the habitat restoration organization. Realize that they will not want to commit to getting all their plants from you because they do not know how successful you will be as a new group. Ask these organizations if they have grant money that they would use for you to purchase plants, soil, and pots (this adds up to about $1. per potted seedling).
Reach out to your community and obtain commitments from qualified volunteer gardeners who want to host a Micro-Nursery for 1-1/2 to 2-1/2 years. Provide them with clear instructions on how to plant their baby seedlings in pots, where to arrange their Micro-Nursery with the right amount of sun, and how to keep them properly watered. Schedule a specific date for everyone to receive the materials and be ready to quickly pot them.
Begin planning your first round of Micro-Nurseries at least as soon as the fall, or even earlier if the commercial nurseries require a longer lead time. You need to be ready to receive your baby seedlings from a commercial nursery in the spring as the plants are ready to come out of winter dormancy. Once your receive the baby seedlings from the commercial nursery, they need to be potted within a week, since they had been stored frozen to keep them dormant, but are now thawed and will deteriorate if not planted quickly.
Figure out how you will get 500 pounds of soil, 100 nursery pots, 100 seedlings, and a piece of landscape fabric to each of your volunteers. Most people do not have a vehicle big enough to handle 500 lbs of soil all at once, so this is the biggest hurdle. You could purchase a dump truck load of topsoil, delivered at a central location and have your volunteers come to pick it up themselves, but this will involve a lot of shoveling and a potential mess in peoples cars. Fortunately, many of your friends and neighbors own pickup trucks that they rarely use to haul anything. Some will be happy to contribute use of their trucks, perhaps driving it themselves to make the deliveries.
Organize to deliver all the materials to each volunteer on your kickoff date. First, each pickup truck will go to the soil supplier and be loaded with topsoil for a set number of Micro-Nurseries. Each pickup truck should be able to transport enough materials for 2 or 3 Micro-Nurseries at a time. Each loaded truck will then come to your central location where you give them the pots, plants, and landscape fabric for each Micro-Nursery.
Each Micro-Nursery volunteer should indicate a spot on their property for you to deliver the soil. The pickup truck drivers or a helper should only shovel the soil off the truck, leaving the property owner the responsibility of moving it to where their Micro-Nursery will be. It is much easier to shovel 500 pounds of soil down off the back of a truck than it would be to have to shovel it up onto the truck, so this goes surprisingly quickly, enabling your pickup trucks to do up to 3 deliveries in an hour, depending on distance from soil suppliers and your central location.
Once each Micro-Nursery volunteer receives their plants, much of the rest is up to them. Make sure they know that the baby seedlings are delicate and need to be and kept in a cool, dark place and potted within a couple of days. Make sure your volunteers know that potting each baby seedling will take about 2 minutes, for a total of over 3 hours work for all 100!
Maintain a spreadsheet with the names, addresses, and contact information of your volunteer gardeners, along with the number of each type of plant they have. Use this as your inventory to keep track of what you have available, and which plants have died or been donated.
Stay in contact with your habitat restoration organizations and find out when they are planning each season’s habitat restoration projects. Agree with them how many plants you will provide to them, then organize your volunteer gardeners, and pickup truck drivers to collect the finished seedlings and deliver them to the habitat restoration sites at the proper time. This is usually done in the fall.